Using the ETF/ETP* Screener
Screening for ETF/ETPs on Fidelity.com is easy with new data and analytics. To take advantage of all the rich interactive features of the Screener and for an optimal experience, make sure you have the most up-to-date browser version.
Getting Started
1 of 7  Next
Next 
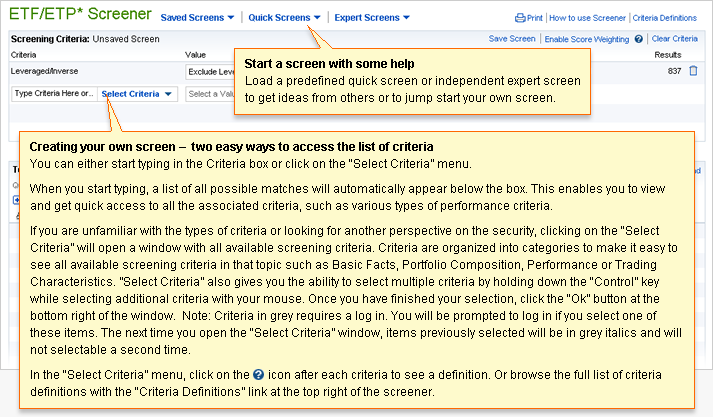
Start a screen with some help
Load a predefined quick screen or independent expert screen to get ideas from others or to jump start your own screen.
Creating your own screen – two easy ways to access the list of criteria
You can either start typing in the Criteria entry box or click on the “Select Criteria” menu.
When you start typing, a list of all possible matches will automatically appear below the box. This enables you to view and get quick access to all the associated criteria, such as various types of performance criteria.
If you are unfamiliar with the types of criteria or looking for another perspective on the security, clicking on the “Select Criteria” menu will open a window with all available screening criteria. Criteria are organized into categories to make it easy to see all available screening criteria in that topic such as Basic Facts, Portfolio Composition, Performance or Trading Characteristics. “Select Criteria” also gives you the ability to select multiple criteria by holding down the “Control” key while selecting additional criteria with your mouse. Once you have finished your selection, click the “Ok” button at the bottom right of the window. Note: Criteria in grey requires a log in. You will be prompted to log in if you select one of these items. The next time you open the “Select Criteria” window, items previously selected will be in grey italics and will not be selectable a second time.
In the “Select Criteria” menu, click on the question mark help icon after each criteria to see a definition. for that criteria Or or browse the full list of criteria definitions with the “Criteria Definitions” link at the top right of the screener.
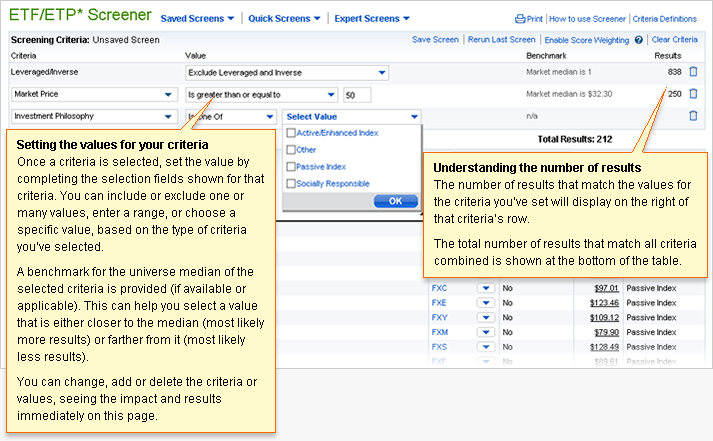
Setting the values for your criteria
Once a criteria is selected, set the value by completing the selection fields shown for that criteria. You can include or exclude one or many values, enter a range, or choose a specific value, based on the type of criteria you’ve selected.
A benchmark for the universe median of the selected criteria is provided (if available or applicable). This can help you select a value that is either closer to the median (most likely more results) or or farther from it (most likely less results).
Once you’ve completed entering the values, click off the selection or input fields for the screener to search for your results.
You can change, add or delete the criteria or values, seeing the impact and results immediately, all on this page.
Understanding the number of results
The number of results that match the values for the criteria you’ve set will display on the right of that criteria’s row.
The total number of results that match for all criteria combined is shown at the bottom of the table.
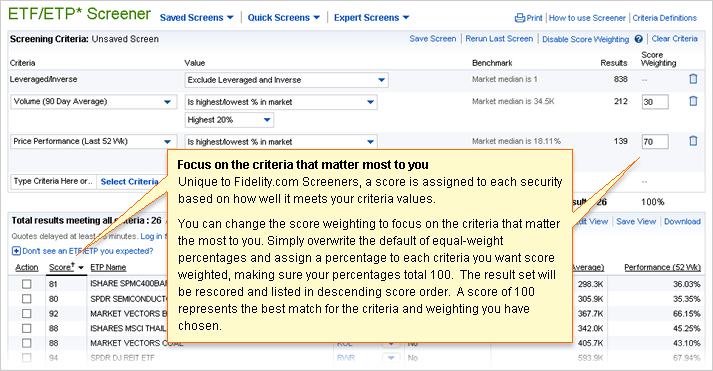
Focus on the criteria that matter most to you
Unique to Fidelity.com Screeners, a score is assigned to each security based on how well it meets your criteria values. The screener results are sorted by score as a default.
You can change the score weighting to focus on the criteria that matter the most to you by clicking the Enable Score Weighting link. Simply overwrite the default of equal-weight percentages and assign a percentage to each criteria you want score weighted, making sure your percentages total 100. The result set will be rescored and listed in descending score order. A score of 100 represents the best match for the criteria and weighting you have chosen.
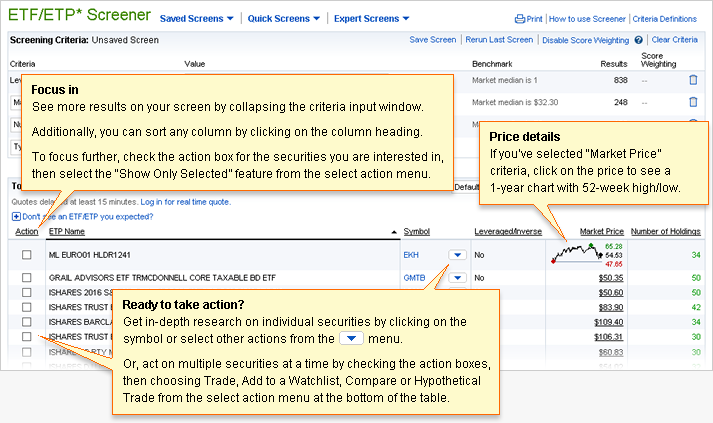
Focus in
See more results on your screen by collapsing the criteria input window with the collapse button.
Additionally, you can sort any column by clicking on the column heading.
To focus further, check the action box for the securities you are interested in, then select the “Show Only Selected” feature from the select action menu at the bottom of the results table.
Price details
If you‘ve selected “Market Price” criteria, click on the price to see a 1-year chart with 52-week high/low.
Ready to take action?
Get in-depth research on individual securities by clicking on the ![]() symbol or select other actions from the symbol action menu
symbol or select other actions from the symbol action menu
Or, act on multiple securities at a time by checking the action boxes, then choosing Trade, Add to a Watchlist, Compare or Hypothetical Trade from the select action menu at the bottom of the table.
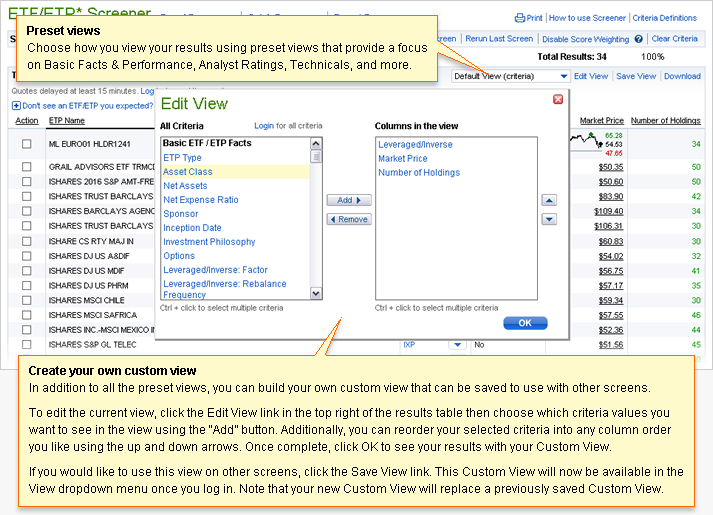
Preset views
Choose how you view your results using preset views that provide a focus on Basic Facts, & Performance, Analyst Ratings, Technicals and more.
Create your own custom view
In addition to all the preset views, you can build your own custom view that can be saved to use with other screens.
To edit the current view, click the Edit View link in the top right of the results table then choose which criteria values you want to see in the view using the “Add” button. Additionally, you can reorder your selected criteria into any column order you like using the up and down arrows. Once complete, click OK to see your results with your Custom View.
If you would like to use this view on other screens, click the Save View link. This Custom View will now be available in the View dropdown menu once you log in. Note that your new Custom View will replace a previously saved Custom View.
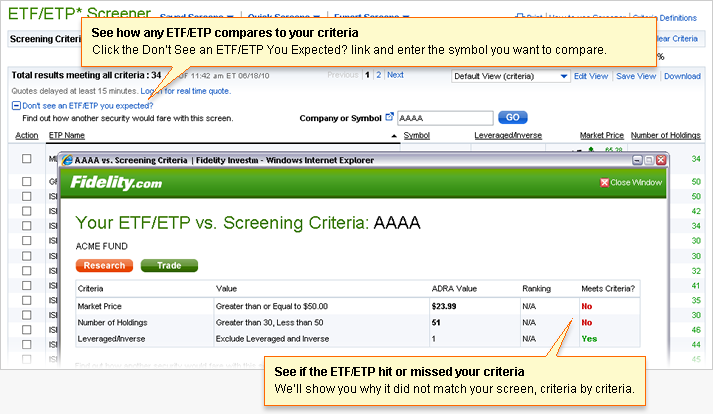
See how any ETF/ETP compares to your criteria
Click the Don’t See an ETF/ETP You Expected? link and enter the symbol you want to compare.
See if the ETF/ETP hit or missed your criteria
We’ll show you why it did not match your screen, criteria by criteria.
Explore Your Results Further
 Previous
  7 of 7
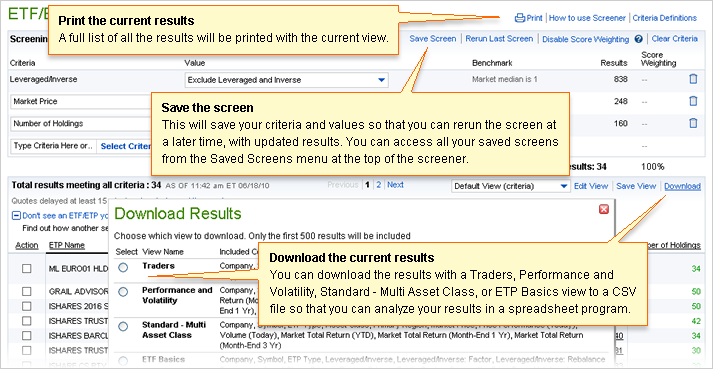
Print the current results
A full list of all the results will be printed with the current view.
Save the screen
This will save your criteria and values so that you can rerun the screen at a later time, with updated results.
Download the current results
You can download the results with a Traders, Performance and Volatility, Standard – Multi Asset Class, or ETP Basics view to a CSV file so that you can analyze your results in a spreadsheet program.
